Categories
Construction Encouraging wildlife and nature Shabbihaus retrofit Ventilation & fresh air

My Shabbihaus eco retrofit project part 4 living wall insulation

Dry air in the house is a good achievement but I have also been worrying about the pollution levels. Two of the three air intakes are located above the back garden and the front one has some good tree coverage between it and the road but it is still a busy traffic area. This made me look at some alternative ways of cleaning the air, I did some googling and came across the NASA research project on houseplants and their impact on air quality. Now before I go any further I do realise that these were controlled tests and we would also need a very large number of plants to get a big impact but I figure it can’t hurt and what I made looks great.

I have been keen to do something with reclaimed wood and also to add some extra insulation to the flank wall in the kids bedroom so I got a bit carried away here and produced this wall made from old pallets with 50mm of woodfibre insulation behind it. I was a bit nervous about this project as it has a bit more of a design impact than some of the other projects, it’s been in a while now though and I am so pleased with the outcome visually. 

The first thing we did was tour the streets collecting abandoned pallets. I found that ones that were slightly broken already were better as they are easier to dismantle than really well built ones. The kids really enjoyed the collection process and I also got them to stain some of the planks we extracted to add some variety to the wall.

Next step was to get hold of some wood fibre insulation, not so easy for small quantities but thanks to https://phstore.co.uk/ for arranging it for me, delivery costs almost the same as the insulation in small quantities but cheaper than elsewhere and charming service too. I then fixed some 50mm battens to the wall at 600mm and push fitted the insulation between. 

The next bit involved a nail gun so was great fun managed to charm the lady at Travis Perkins into giving me a discount and I was off. I fixed them in an offset pattern and tried to group similar widths of board together so it wasn’t too bumpy. 

Then we had to make shelves for the plants to grow on. I used the ‘dice’ from the pallets (technical term for the square bits that go in between the pallets) screwed into the wall to support shelves made from more pallet boards. These dice are pretty tough and tricky to drill through, one of them still has half a drill bit in it where it snapped. 

Once it was all up we put in the plants, I used Chinese evergreen, peace lily, some snake plants and a cutting from an old spider plant. I also put in a watering system! Well, I bought some globes that you fill up and they drip out over a couple of weeks, they are a bit inconsistent but a lot cheaper than some automated system. I top them up with waste water from kids water bottles and they are still growing nearly a year later.

Categories
Gadgets Money saving Shabbihaus retrofit sustainability Using less energy

My Shabbihaus eco retrofit project part 2 Boiler replacement

This came about through problems with the old boiler rather than careful planning. Firstly I replaced the thermostat with a Smart controller, this was about 5 years ago and the choice was limited but I got an Owl controller which allowed us to control the heating with a smart phone.

This allowed us to monitor electricity use as well as program the boiler simply online and turn it off for holidays etc. The controller was easy to fit as you replace the existing thermostat and use the same wiring. Once this was done the heating started coming on only when the temperature in the house fell below the required temperature we set. The previous controller turned on the heating when it was programmed to, regardless of the internal temperature and waited for the thermostat to turn it off again. This fine control and ease of use saved us 10% on our gas bills straight away.

The monitor really helped us concentrate on electricity use around the house and focus on reductions, however it also coincided with having kids and being at home a lot more so our usage actually went up for each successive year, as shown below. Now they are a bit bigger we are out more and using the meter to concentrate their minds too and starting to take our usage down again:

The boiler was an old Worcester and only about 64% efficient. A fault developed with it so it started heating up radiators whenever we used the hot water so we decided to get rid of it. I did plenty of research and luckily enough this coincided with Ecobuild so I was able to go round stalls there to look at a good range of boilers and ask silly questions. Efficiency of most boilers is well over 90% so my main concerns were how it would fit in my kitchen and reliability. I eventually settled on an Intergas boiler, not quite so common in the UK but it came with a 10 year guarantee and has very few moving parts and good reliability.


Very pleased with the boiler and five years later there have been no problems. We are warmer, the shower works better and our gas bills went down.

Very pleased with the boiler and five years later there have been no problems. We are warmer, the shower works better and our gas bills went down.

We also got TRVs installed on all the radiators.

Categories
Ecology Ecoretrofit Encouraging wildlife and nature Green roofs Projects

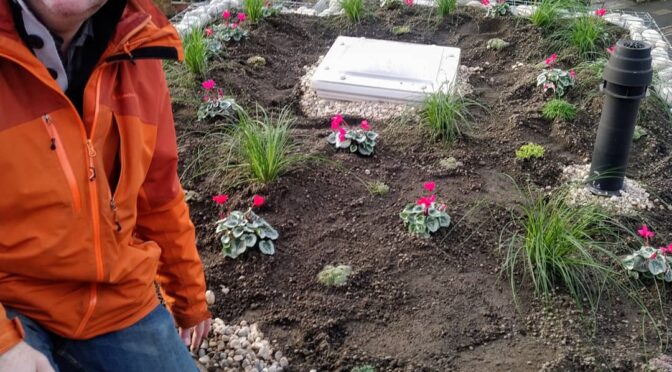
Gabions and cyclamen, a new green roof in Herne Hill

It’s taken a little while to share this new green roof I built in Herne Hill recently.

There were a number of challenges here particularly the height of the roof with no edge protection, we used a harness to install the edges.

The edges were built using gabion cages filled with cobbles. This created a more natural edge and ensured the stones didn’t roll off the edge of the roof and shatter the tiles below, I think they look pretty cool.

I used aerated clay pebbles for the drainage layer again, really like these rather than the plastic sheets and carrying a bag makes you feel really strong as they are so lightweight. We then put in a protective membrane and covered with ultra lightweight green roof substrate from Shire Substrates.

The roof has been seeded with a mixture of wildflowers and grasses with more to be added in the spring. In the meantime I put in some grasses, sedums and also Cyclamen. I wasn’t really sure about the cyclamen but not much else is flowering this time of year a month later and they seem to have settled in well.

I will add further updates in the spring. There are lots of bulbs in there which should appear soon.

Categories
Construction Ecoretrofit Home Surveys Money saving Projects

Putney retrofit project


#putneyretrofit
No garden to put the sign in

I am currently refurbishing this gorgeous two bedroom flat in Putney. The client is very keen to improve the performance of the house and I am working on the structure to ensure it will be warm, airtight and condensation free for the future. A Parity Home Energy Masterplan has also been carried out for the property and we are using this to inform the refurbishment.

#putneyretrofit
Important welfare facilities in place. Might need a spoon


The flat is spread over two floors with two roof terraces and the top floor is a loft conversion, this means there are lots of different types of construction and different opportunities to add different insulation types suitable for that construction.


We are also working very hard to minimise the VOC level in the flat and using appropriate

#putneyretrofit
Special low emission expanding foam

materials to combat this. I have been been checking all the materials before they come on site and consulting with the client to ensure she is happy. We have had to compromise in some areas, for instance the ceiling height is restricted in the loft conversion so we are using PIR insulation to keep as much space as possible, we have managed to source Isocynate free expanding foam to fill the gaps though so won’t be adding anymore chemicals to the air in the installation.


I will be adding updates and photos as this fascinating project progresses. I will mark them all #putneyretrofit

Categories
Construction Design Ecology Ecoretrofit Encouraging wildlife and nature Green roofs Projects

Extension in Kennington with green roof

I went to visit an extension in Kennington which has the biggest domestic green roof I have built. There are some very big skylights so it isn’t all green but it looks great. This first picture shows the rear extension with some rather fine timber cladding, you can see the plants poking over the top of the coping stones:

[peg-image src=”https://lh3.googleusercontent.com/-xhn4KEO_3JM/V4zldoHH5eI/AAAAAAAAXtw/V_BDsK0hAiYCaZY-CG5ieEuil4Zh5hUNQCHM/s144-o/IMG_20160718_143650.jpg” href=”https://picasaweb.google.com/106273352894365708957/6309743418905257873?authkey=AvRWaf1IHgo#6308669475185485282″ caption=”” type=”image” alt=”IMG_20160718_143650.jpg” image_size=”3264×2448″ peg_gal_order=”false” ]

The combination of rain and sunshine we have seen this summer has been really good for the plants, even if people haven’t been so happy. I missed the peak flowering of this roof but there were still plenty in bloom on Monday. The clients daughter has a bedroom window looking out onto the roof and has been enjoying the developing scene.

[peg-image src=”https://lh3.googleusercontent.com/-gjklVXE-k6I/V4zlsGy6-NI/AAAAAAAAXtw/JMqgXOzcgdMA8hSZ56Fpp9o7478SLZuDQCHM/s144-o/IMG_20160718_143829.jpg” href=”https://picasaweb.google.com/106273352894365708957/6309743418905257873?authkey=AvRWaf1IHgo#6308669723940419794″ caption=”” type=”image” alt=”IMG_20160718_143829.jpg” image_size=”3264×2448″ peg_gal_align=”left” peg_img_align=”left” ]

The skylights really bring light into the house and the kitchen looks even bigger than the space the extension added on. You can see some of the plants waving in the breeze around the sides when you are having dinner.

[peg-image src=”https://lh3.googleusercontent.com/-NwWuePns30Y/V4zlA8R2XBI/AAAAAAAAXtg/I16FSfo8_HoZ9IxJBfhrryY1e7IDZGt-QCHM/s144-o/IMG_20160718_143606.jpg” href=”https://picasaweb.google.com/106273352894365708957/6309743418905257873?authkey=AvRWaf1IHgo#6308668982382976018″ caption=”” type=”image” alt=”IMG_20160718_143606.jpg” image_size=”3264×2448″ ]

[peg-image src=”https://lh3.googleusercontent.com/-bCkZ92ndP6c/V4zmVA5rqqI/AAAAAAAAXt8/82ASBvAnkiAbhwgMVhmrtZGDDN_HN5migCHM/s144-o/IMG_20160718_144054.jpg” href=”https://picasaweb.google.com/106273352894365708957/6309743418905257873?authkey=AvRWaf1IHgo#6308670426732800674″ caption=”” type=”image” alt=”IMG_20160718_144054.jpg” image_size=”3264×2448″ ]

Categories
Construction Ecology Ecoretrofit Encouraging wildlife and nature Green roofs Projects sustainability

Reclaimed materials in side return extension in Hackney

A side return infill extension with an industrial style. Extensive use of reclaimed materials, high standards of insulation and a wildflower green roof.

We completed this project late on last year working with Clements Design as the architects.

The project aimed to turn a cramped kitchen into a spacious area for cooking, eating and socialising. There is an industrial and sustainability theme to the project, the materials used are often from or designed for factories. Electrics are contained in galvanised metal conduit and the floor is concrete. Walls are exposed brick, both reclaimed glazed brick and the existing London stock bricks revealed to the world. The large glass panels to the roof draw in light to what was once a dark area and bring out the rich colours in the reclaimed wood cladding.

Though the materials could be seen as austere they are softened by the contents of the room that reflect family life, there is space for a large wooden toy stove, a comfy sofa and a gorgeous oak dining table with mismatched chairs.

The large rear doors mean the garden can be seen and accessed easily from the house, the doors can be flung open in the summer for barbecues. The green roof will develop over time but already has wildflowers peeking over the parapet and they can be seen swaying through the glass roof.

The project was also designed in conjunction with the neighbours and they share the party wall and the box gutter.

Sustainability was a key part of the client’s aim for the project. Reclaimed materials were used wherever possible. All the bricks removed in the demolition stage were cleaned and re-used onsite to build the new structure. Internally there are two walls of glazed bricks reclaimed from a lift shaft in Kensington. The other walls are the original brick exposed and insulated on the outside where appropriate. The bi-fold doors are triple glazed with a u-value of 1.09 are factory finished for long life and are made from environmentally sourced timber from sustainable forests. The heating is underfloor and utilises the existing condensing boiler, three Nest controls were added to the system to control this and create two new heating zones in the house.

The wood (for drawer fronts, shelves and cladding) is from a reclaimed wood specialist in Guiseley, Leeds, called Machells and is cut down from Yorkshire Victorian mill joists.

The large pendant lamps are reclaimed from a 1950’s factory in the Stoke area.

The table was made in Leeds from British oak 35 years ago.

All the shelf brackets and drawer handles were made in England in foundries using all traditional methods.

All lighting is LED, even filament style traditional bulbs are actually LED.

The green roof is part plug planted and part seeded with a mixture of wildflowers, meadow plants and some sedums. The roof will flower through most of the year and provide habitat for insects and foraging for birds amongst other biodiversity benefits.

Categories
Ecology Ecoretrofit Encouraging wildlife and nature Green roofs Using less water

Nine months in and this green roof has been thriving

I went to see the roof I built in Kennington last month and took some photos I thought I would share. I wrote about this one last year showing the build up process to a green roof. I was particularly pleased that the insulation we put on as an added extra has made a real difference to the householders, the side return was previously a no-go area in the cold winter months but has now become habitable with the added warmth.

Anyway here are a few photos to illustrate how well the roof has been growing over the last nine months:

The flowers are growing well including the grape hyacinth
The flowers are growing well

A really good selection of wildflowers has sprung up

Maybe I should have made the middle access a little narrower

Overall I am delighted with the roof and the clients are really pleased too. The roof has already developed really well and should develop further over the next few years. The roof should reach maturity after three years but different plants will dominate in different years and seasons.

If you want your own green roof give me a ring on 020 8133 0190 or drop me an email alex@ecoalex.com


Categories
Construction Ecology Ecoretrofit Encouraging wildlife and nature Green roofs sustainability

Green roof in South London

Last week I completed another green roof in Streatham. It is on the rear of a really interesting house, a 1930s semi that is getting a complete eco-makeover from the owner. He has insulated the walls inside and out with wood fibre and remade the roof in solar panels and that is just the start. All Stephen’s neighbours find it hard to believe how warm the house is without loads of heating!

Anyway, last Wednesday he set aside so I could come along and help him build a green roof, here are the photos:

The roof is on top of this single storey extension

The first layer of the green roof, a fleece to protect the waterproofing and retain some of the water.

Then we added a drainage layer to encourage free draining.

Next is the root barrier and then special substrate

We planted the roof with sedums, widlflower plugs and sowed a selection of wildflower seeds

The finished article

It should grow and develop over the next few years until it reaches maturity.

Categories
Using less energy

Open House Weekend

Last week was Open House weekend as the 40,000 or so people that went to Battersea Power Station should know. Having had a quick peek at it recently as part of the improvement zone project I was able to visit a couple of eco homes instead. Having seen quite a number of architect led fantasy eco homes as part of other tours I was eager instead to see some normal houses that had been upgraded at a reasonable cost and with great savings.

The first visit was to The Coach House in Belsize Park a lovely house on the end of a Georgian terrace. Waiting outside we particularly admired the tradesman’s entrance with the big Tradesmen sign above it. tradesman

We were welcomed in by the owners along with a couple of other early risers. We began with an introduction to the house and the owners ambitions for the refit. They wanted to achieve somewhere near the 80% reduction in carbon emissions and energy usage that the government has committed to for 2050. They have achieved something near this through insulating the walls and the roof, replacing and refurbishing windows and using low energy bulbs and heating controls.

The walls were particularly impressive, the internal wall insulation added at the front of the house is almost impossible to spot:

Internal wall insulation


And the only way to tell that the outside has been done is to tap the wall and listen to the slightly hollow sound created by the foam underneath:

IMAG0996

The roof was mostly flat and had been insulated externally with decking placed on top of that so you can walk on it:

roof insulation


Inside there is a an Owl electricity meter and Passivsystems heat control. I was pleased to learn afterwards that they had used a Parity Home Energy Masterplan to plan out the refurbishment of their house.

You can read lots more about the house and see videos on the Superhomes website. Well worth a look, particularly to see how unobtrusive wall insulation is. A lot of people I speak to seem to think it will make there rooms tiny but this is definitely not the case, and you get great windowsills for plants etc.

This was further illustrated by the next house we visited in a mansion block near King’s Cross. This was also a super home and a cosy flat Judd-St-374x294

on the top floor. The flat had also had internal insulation on the walls and this time the ceiling as well. Again the insulation couldn’t be seen and the owners had also added coving to the ceiling and the same time improving the look of the flat.


Categories
Construction Ecoretrofit Money saving sustainability Training

Lime plastering course

I have spent the last couple of days on a lime plastering course in Bedford. I am learning this skill so I can deliver more retrofit services to the customers of www.ecoalex.com. One of the key ways to improve the energy performance of older houses is to add internal insulation to walls. There are lots of people offering this service with celotex and other oil based insulation materials. These are very efficient and applicable in many more modern homes, however they do require careful installation of vapour barriers in the walls and have a risk of condensation. I want to be able to offer my customers something a little different, Natural Insulation. This will enable be breathable and allow moisture to pass through it naturally rather than gathering hidden inside the construction of the wall. After talking with a vegan customer I have been looking at wood fibre insulation in batts and boards. To get all this finished properly it needs plastering, modern plaster sets solid and isn’t breathable so I have been learning to work with lime.

There is a resurgence of interest in lime plaster at the moment, partly because of heritage projects like St Pancras station and partly because of a renewed interested in it’s flexibility and breath ability. This meant there was a choice of a few courses, however a lot of them were quite rural and a good distance from London so I chose DIY plastering in Bedford and I am very pleased I did. The course was one to one so I got plenty of help from Paul and could have it tailored to my requirements.

When I got there Paul had prepared two walls, one typical brick one and a second much flatter one to simulate the type of wall I am building using wood fibre insulation. After checking my fitness we agreed to try and plaster both walls so I could tackle any different lime issues. I started with the masonry wall applying two guides across the wall that would cover all the bumps and undulations and produce a flat surface. I then filled in with plaster and used a straight edge to get the plaster flat and even.

Image

Then we left this to dry and I moved on to the flatter surface set up to simulate wood fibre board. Here I applied a much thinner coat of plaster, embedded some mesh in it and then a second thin coat. This was then flattened using the straight edge. Only 10-15mm of plaster are needed as the base wall is so much flatter than an older brick wall. Once these two walls had dried a little I went over them with a float, flattening the surface and adding some roughness for the skim coat. That was day one completed.

Image

Day two was all about getting things smooth, very satisfying it was too. After drying overnight both walls had developed some cracks, especially the masonry one where we had a much thicker covering of plaster. Many of these could be sealed again with the floats but the larger ones needed a bit more compression from the trowel and some extra plaster adding. Next we added the top coat of plaster, this had more lime and less sand to make it smoother, but went on the same way using a trowel. Once the wall was covered with an even layer of topcoat we left it to dry. During this time Paul gave me a quick tutorial in filling holes in walls, very useful for my bathroom wall. Then I went over the wall with a float to even out the plaster further.

Image

After this and some more drying I went over it with a trowel to get it even flatter and remove the air bubbles. It was all very pleasing to produce such a flat surface. At this point you can keep going making it flatter and smoother gradually using the trowel and the float. Looking forward to using the skills on an insulation project next month in Hertfordshire, get in touch if you would like me to help you with your house. I am based in Central London but can travel. There are lots more photos on my Google+ page.

Image